MRx USER GUIDE
Both MRx Console App and MRx App for the supported headset (HoloLens 2 or Quest 3/3S) are required.

MRx Console App
Installed to your Windows 11 laptop/PC from the Microsoft Store. The Console app is used to manage assets and content and to launch session lobbies. An active session lobby is required to run MRx on the headset.
MRx App (HoloLens 2 or Quest 3)
Installed to the headset from the respective app store. Create content and experience the deployed content in the headset. The headset must be on the same network as the MRx Console App to join the session lobby.
HOW IT WORKS
Create Content
Launch MRx Console App:
- Add assets (models, videos, images) and A.I. Bots for use in your content. A.I. Bots is currently not available for the HoloLens 2.
- Select ‘Create Content’ to start the session lobby.
Launch MRx on headset:
(headset must be on same network as Console App)
- Join the session lobby.
- Locate space marker. To collaborate, have other headset(s) join the session lobby before starting.
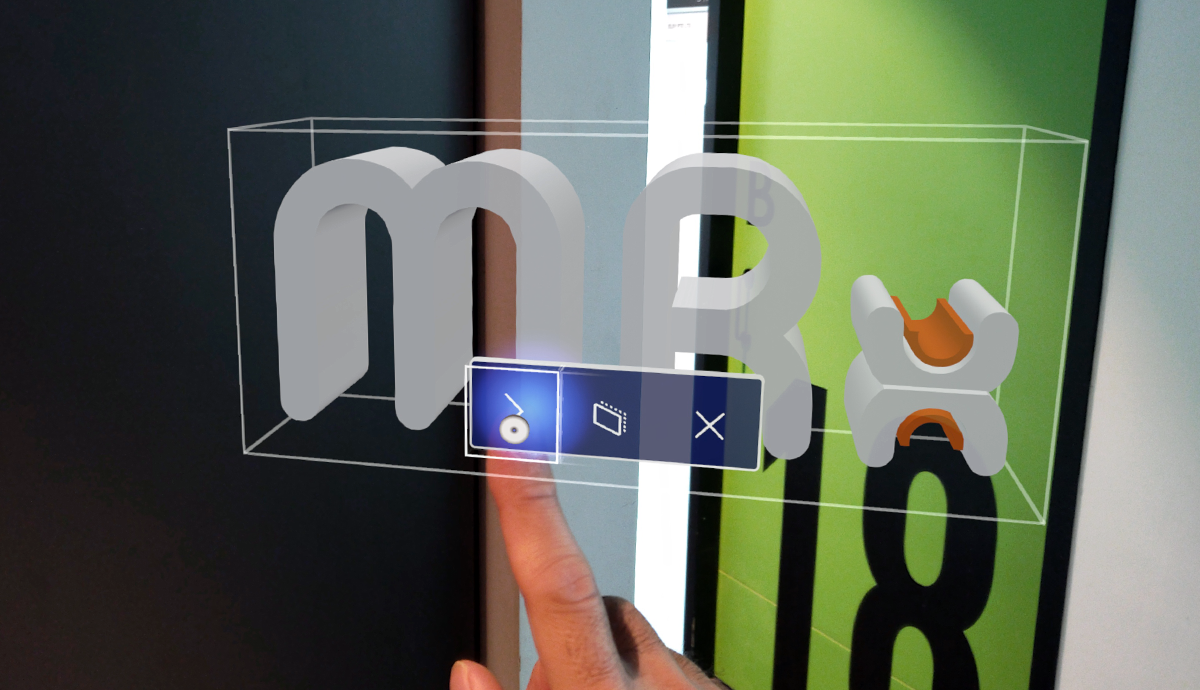
- Create content on the headset using the ‘Gaze and drop’ interface by placing objects into scenes and applying interactions.
Deploy Content to Sessions
Launch MRx Console App:
- Select content to playback or upload the content and share to participants for remote sessions.
- Select playback to start the session lobby. For remote participants, playback the downloaded shared content.
Launch MRx on headset:
(headset must be on same network as Console App)
- Join the session lobby.
- Start when all participants have joined the session lobby.
WHAT YOU NEED
Please consult your IT dept to ensure ports are accessible and device IP address is discoverable.
- Windows 11 laptop/PC.
- Microsoft HoloLens 2 or Meta Quest 3 headset(s).
- Ensure MRx is allowed through firewall on the MRx Console App PC/laptop.
- Device IP must be discoverable and accessible on the network.
- Internet connection is required Quest 3 and remote sessions.
Network Ports Used:
Local Sessions
Ports: 7777, 7778, 5353
Remote Sessions
Ports: 443, 3478; 50000+
INSTALLING MRx
MRx Console App
- Go to the Microsoft Store on your Windows 11 laptop/PC.
- Search ‘MRx’. Download and install the MRx Console app to your machine.
MRx App (Supported Headsets)
- Go to the App Store on your supported headset.
- Search ‘MRx’. Download and install the MRx app to your headset.
PREPARING 3D ASSETS
To export SOLIDWORKS models, please refer to: https://learn.microsoft.com/en-us/dynamics365/mixed-reality/guides/3d-content-guidelines/solidworks
MRx supports .glb models. If your 3D modeling software does not export to .glb, we recommend exporting your model in a format supported by Blender (e.g. .fbx, .obj).
- MRx model ingestion supports one material, texture and normal per mesh. Transparency is supported.
- Triangulate to optimize (minimize) polygon and vertices count.
- Use per–vertex normal and UV.
- Set origin to Center of Mass (Volume). Recenter model by setting Location X, Y, Z to 0. You may also want to set Rotation angle so model is aligned horizontally to the X axis.
- Check that Scale is set to 1.00.
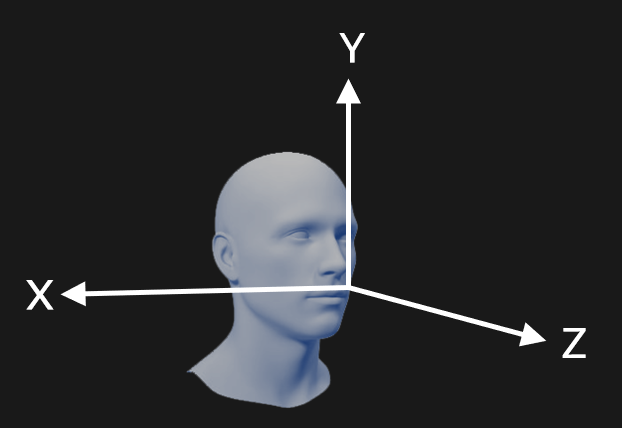
Coordinate System:
See the next section for an example on how to prepare 3D assets with Blender.
ADDING ASSETS AND A.I. BOTS
- Launch MRx Console App on your laptop/PC.
- Click ‘Assets’ on the top menu bar.
- Enter a name for your asset group and click ‘Create’.
- Click ‘Add Asset to Group’ to upload assets into the asset group.
- Click ‘Add AI Bot’ to add bots to the asset group. Note AI Bots is currently not available for HoloLens 2.
- Enter a bot name and its description. Save your changes
Supported File Formats:
3D Models: .glb
Images: .png
Videos: .mp4
CREATING CONTENT
- Launch MRx Console on your laptop/PC.
- Click ‘Create Content’.
- Enter content information and select the asset group(s) to be used in your content. Click ‘Next’.
- Launch a session lobby for the applicable headset. This launches the Session Manager window.
- Launch MRx on the headset to join the session lobby.
- You may be asked to select New Space or use Saved Space.
- If new space, place the marker on the ground, air tap to lock in place.
- Input a name for the first scene to start building your content.
DEPLOY CONTENT (LOCAL)
- Launch MRx Console on your laptop/PC.
- In ‘My Content’, click the Run icon of the desired content.
- Launch a session lobby for the applicable headset. This launches the Session Manager window.
- Launch MRx on the headset and join the session lobby.
- You may be asked to select New Space or use Saved Space.
- If new space, place the marker on the ground, air tap to lock in place.
- Launch MRx on other headsets to join the session.
- When all participants have joined, click ‘Start’ on the Session Manager.
SHARE CONTENT
Internet connectivity is required to upload and share content with participants for remote sessions.
- Launch MRx Console on your laptop/PC.
- In ‘My Content’, click the Upload icon button of the desired content.
- In ‘Uploaded Content’, click the Share icon button of the desired content.
- Input participant emails to send download link.
Invited participants will need to install MRx Console and MRx. They will receive an email with a link to download the content.
DEPLOY CONTENT (REMOTE)
Remote participants will need to install both MRx Console and MRx app. The invitation email will contain the download link for the shared content.
- Launch MRx Console on your laptop/PC.
- In ‘Uploaded Content’, click the Run icon button of the shared content. For remote participants, click the Run icon button of the shared content in ‘Downloads’ (content downloaded from email links are found there).
- Launch a session lobby for the applicable headset. This launches the Session Manager window
- Launch MRx on the headset and join the session lobby.
- Place the marker on the ground, air tap to lock in place.
- Launch MRx on other headsets to join the session.
- When all participants have joined, click ‘Start’ on the Session Manager.
Remote participants will join the session at the lobby and appear as avatars.
PREPARING 3D ASSETS – BLENDER EXAMPLE
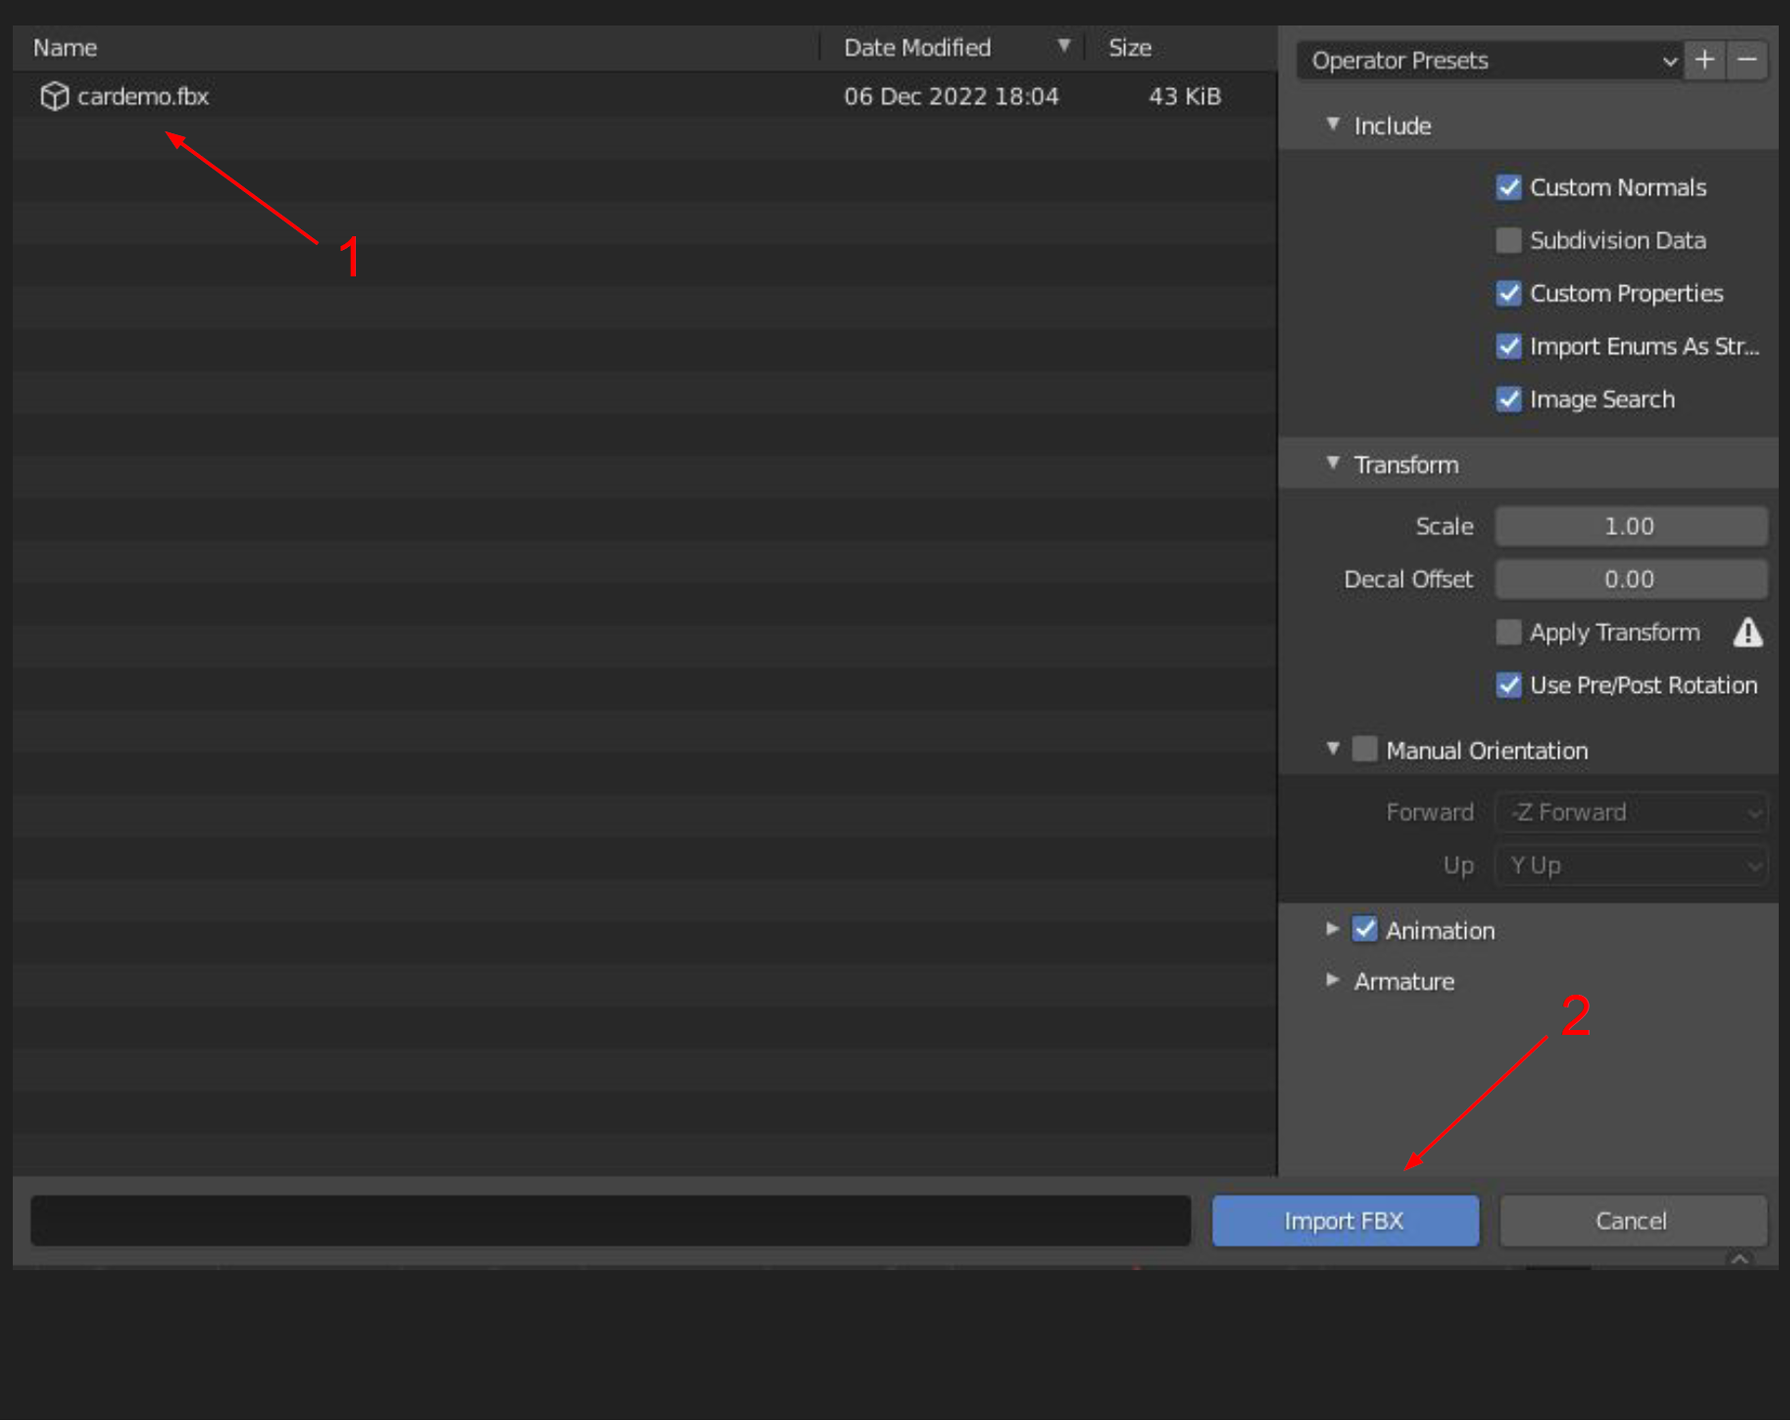
IMPORT MODEL
- Open a new scene in Blender. Go to File > Import and select the file type of the asset you want to import (.FBX in this example)
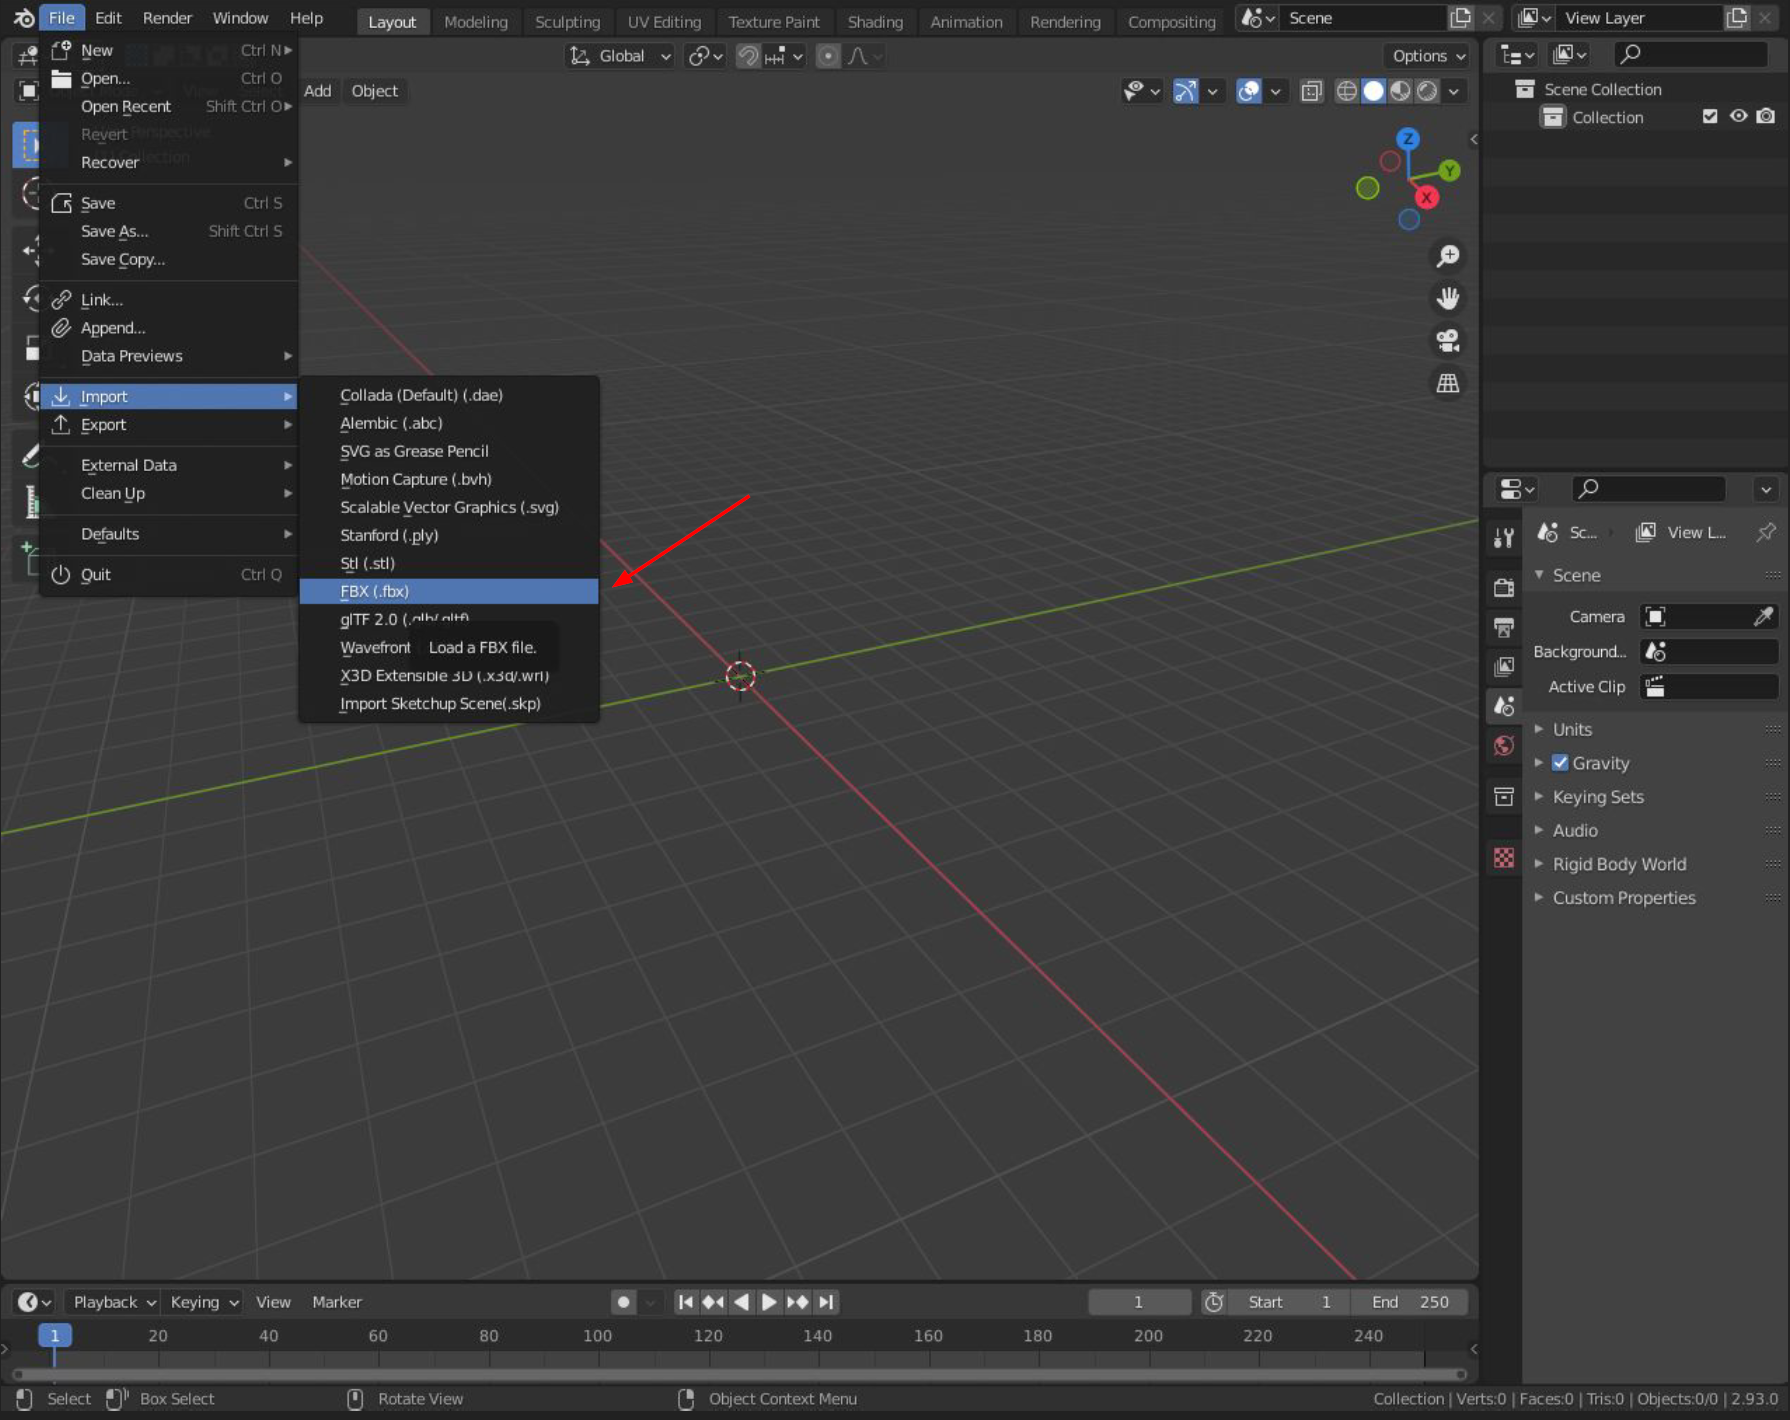
- Select your model’s file and click Import FBX.
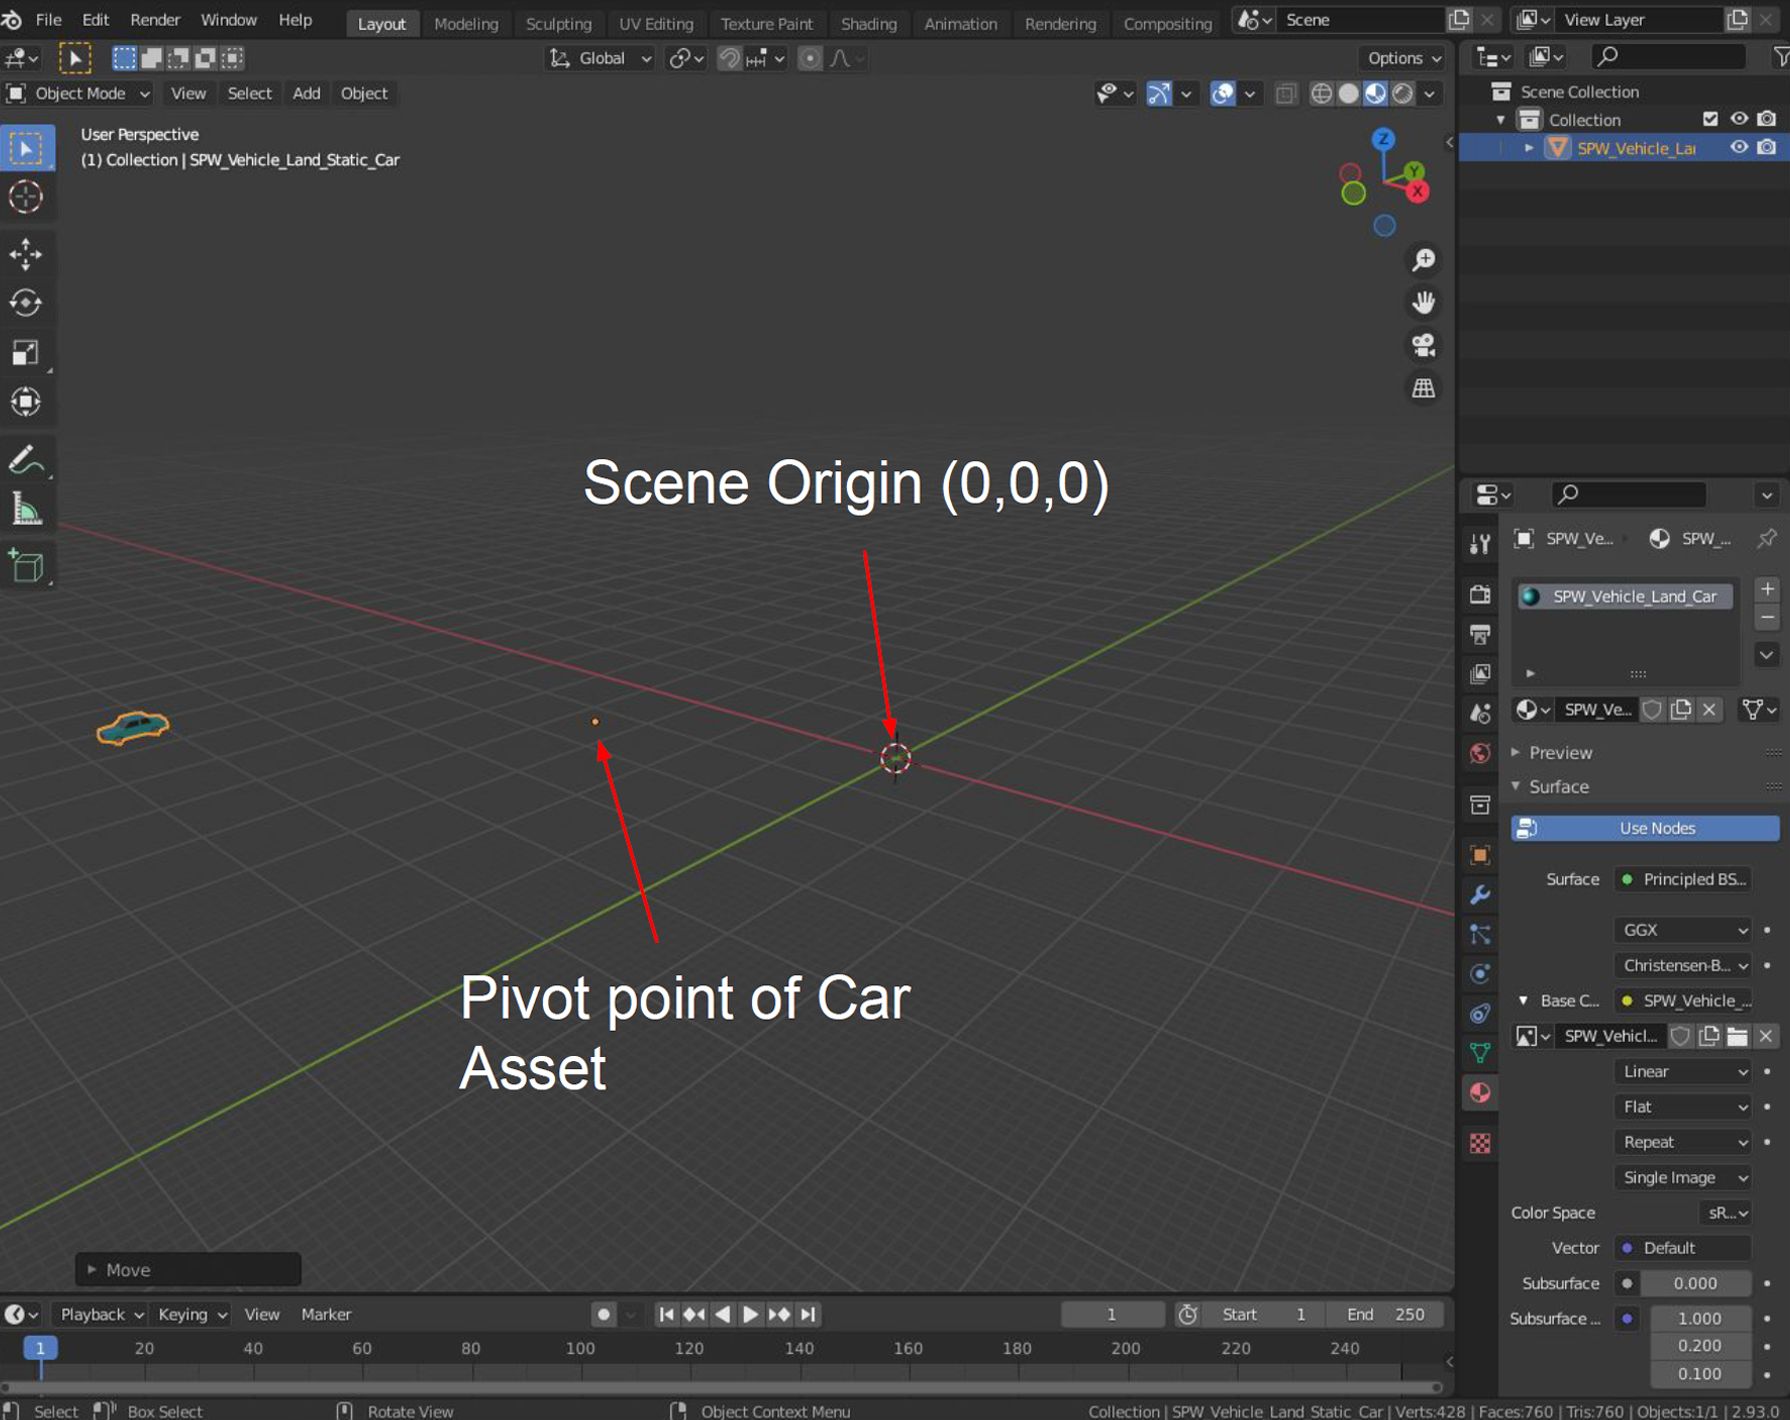
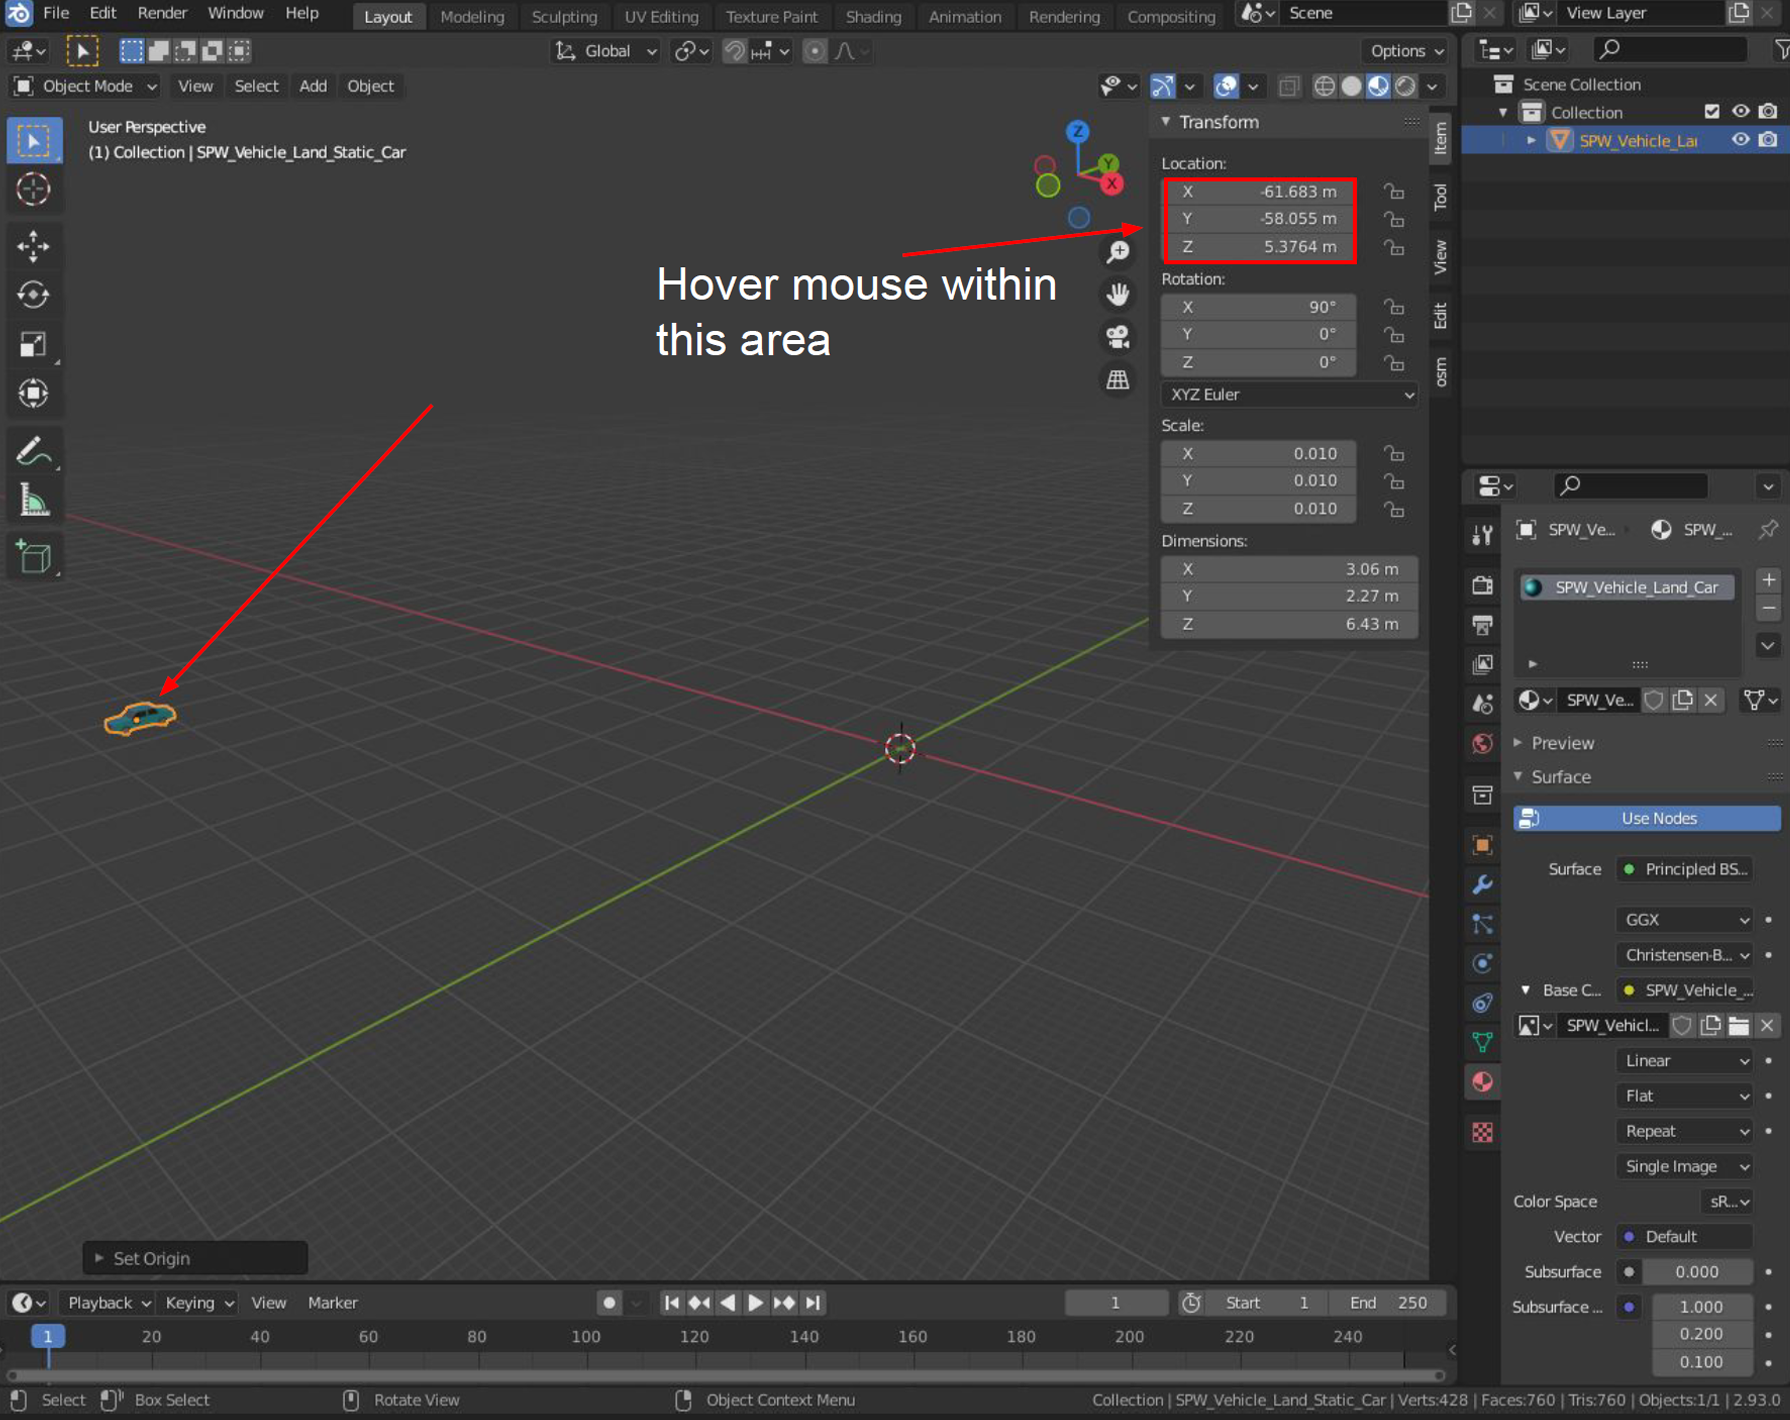
SET PIVOT POINT
- The red and green lines represent the x and y axes respectively. The scene origin is at the intersection of these two lines. When an object is selected, it will be highlighted with its pivot point, shown as an an orange dot.
- Make sure you are on the Item tab and press “N” to bring up the Side Menu.
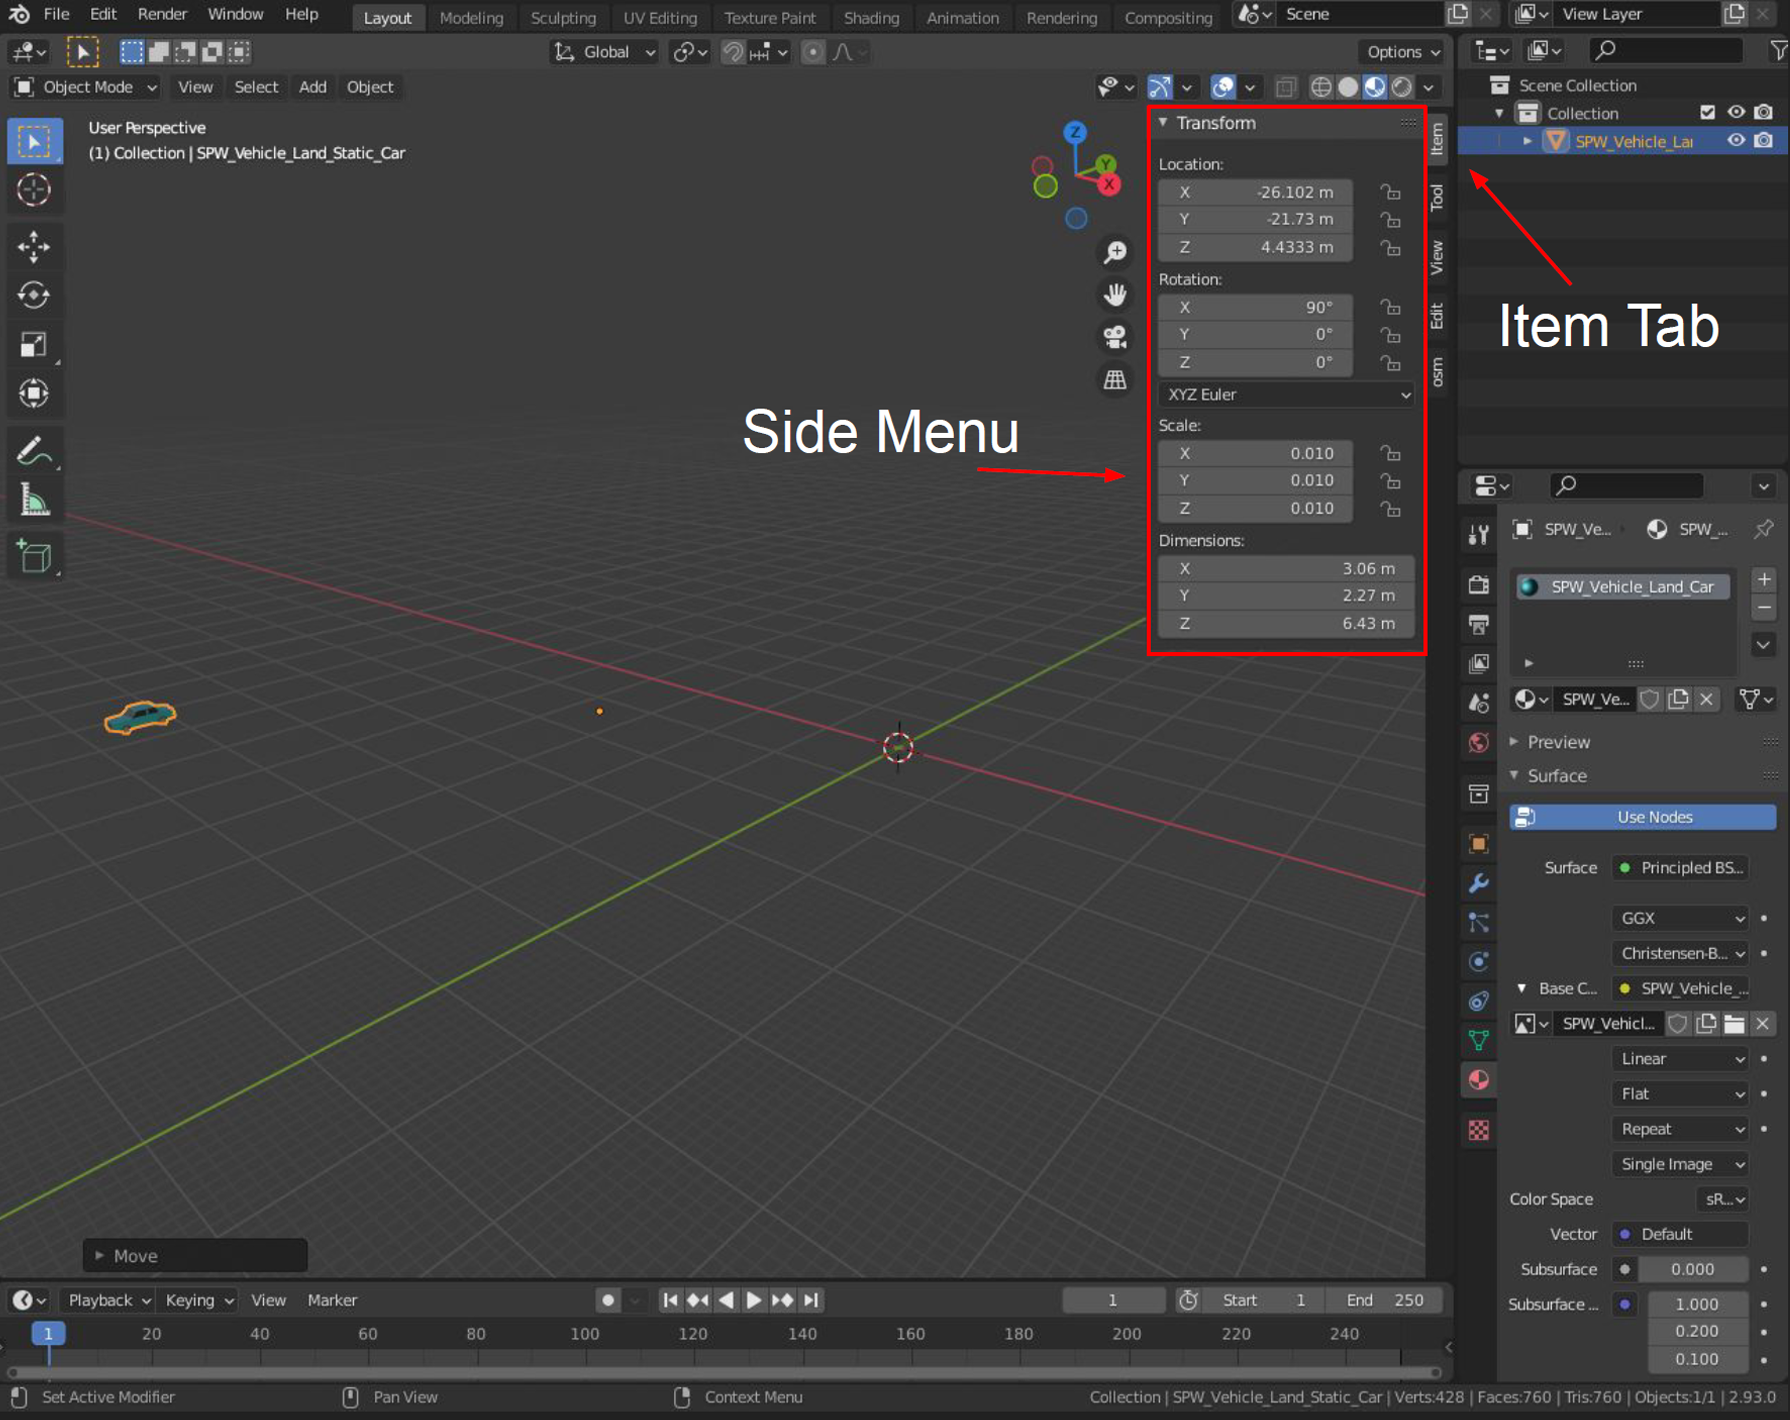
- Make sure the object is still seletected then go to Object > Set Origin > Origin to Geometry. This sets the pivot point in the center of the object.
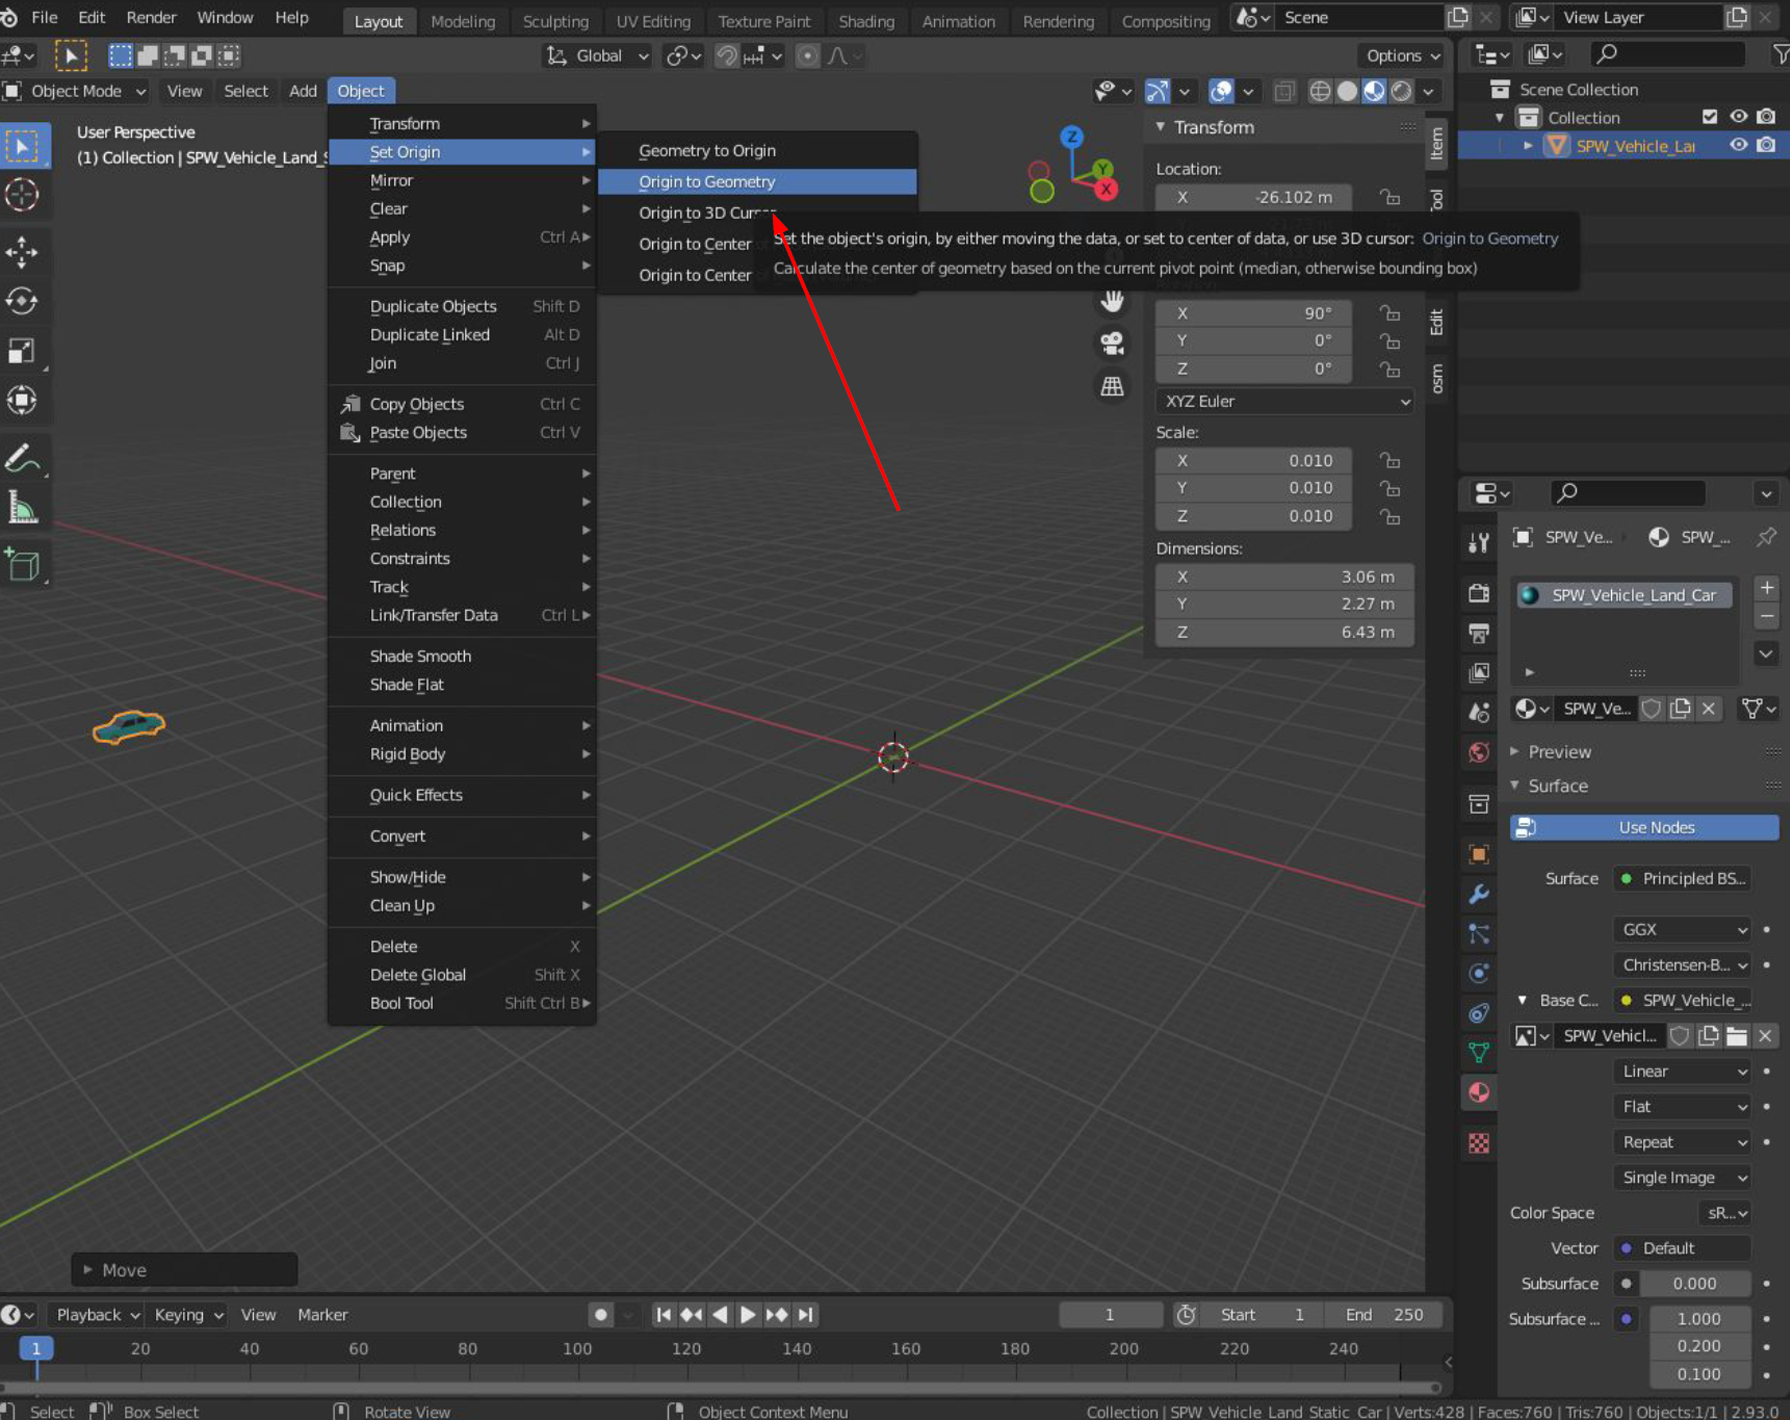
- Notice that the pivot point is now inside the object. Hover your mouse cursor over the Location section of the Side Menu and click the Backspace key. The Location values should now all be 0.
SCALE AND ORIENTATION
- Press “S” and move your mouse to scale the object. Left click on mouse when done. Likewise, you may also directly enter the Dimensions value by clicking on each respective value.
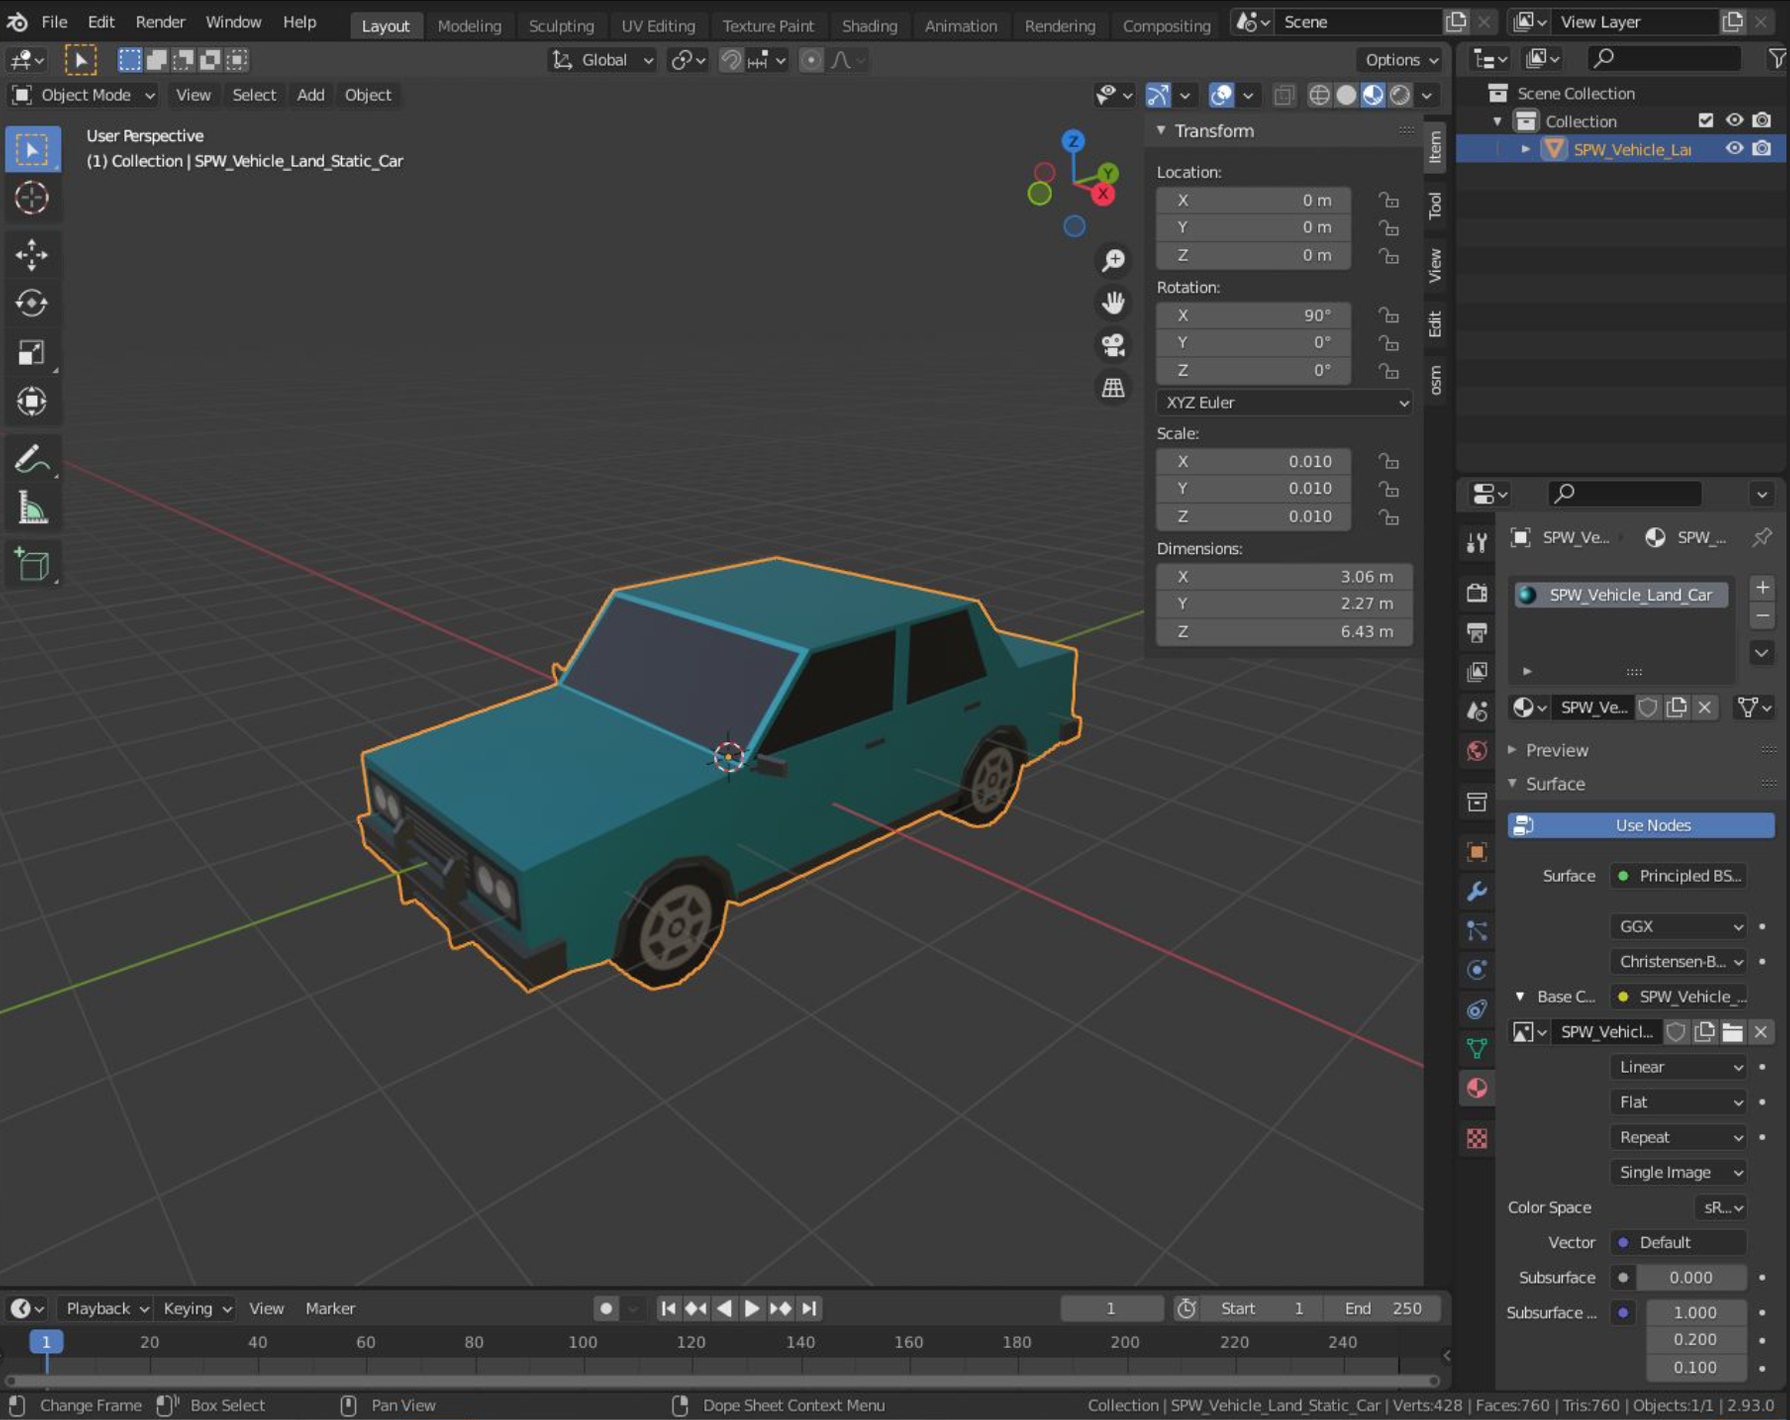
- To rotate, press ‘R’ and move your mouse. You can lock it to rotate on only one axis by pressing the ‘X’, ‘Y’ or ‘Z’ keys for their respective axes. Likewise, you may also hold down “CTRL” and enter the rotation value. Left click on mouse when done. Note that “front” is in the direction of positive Y-axis (see axes diagram next to the Side Menu).

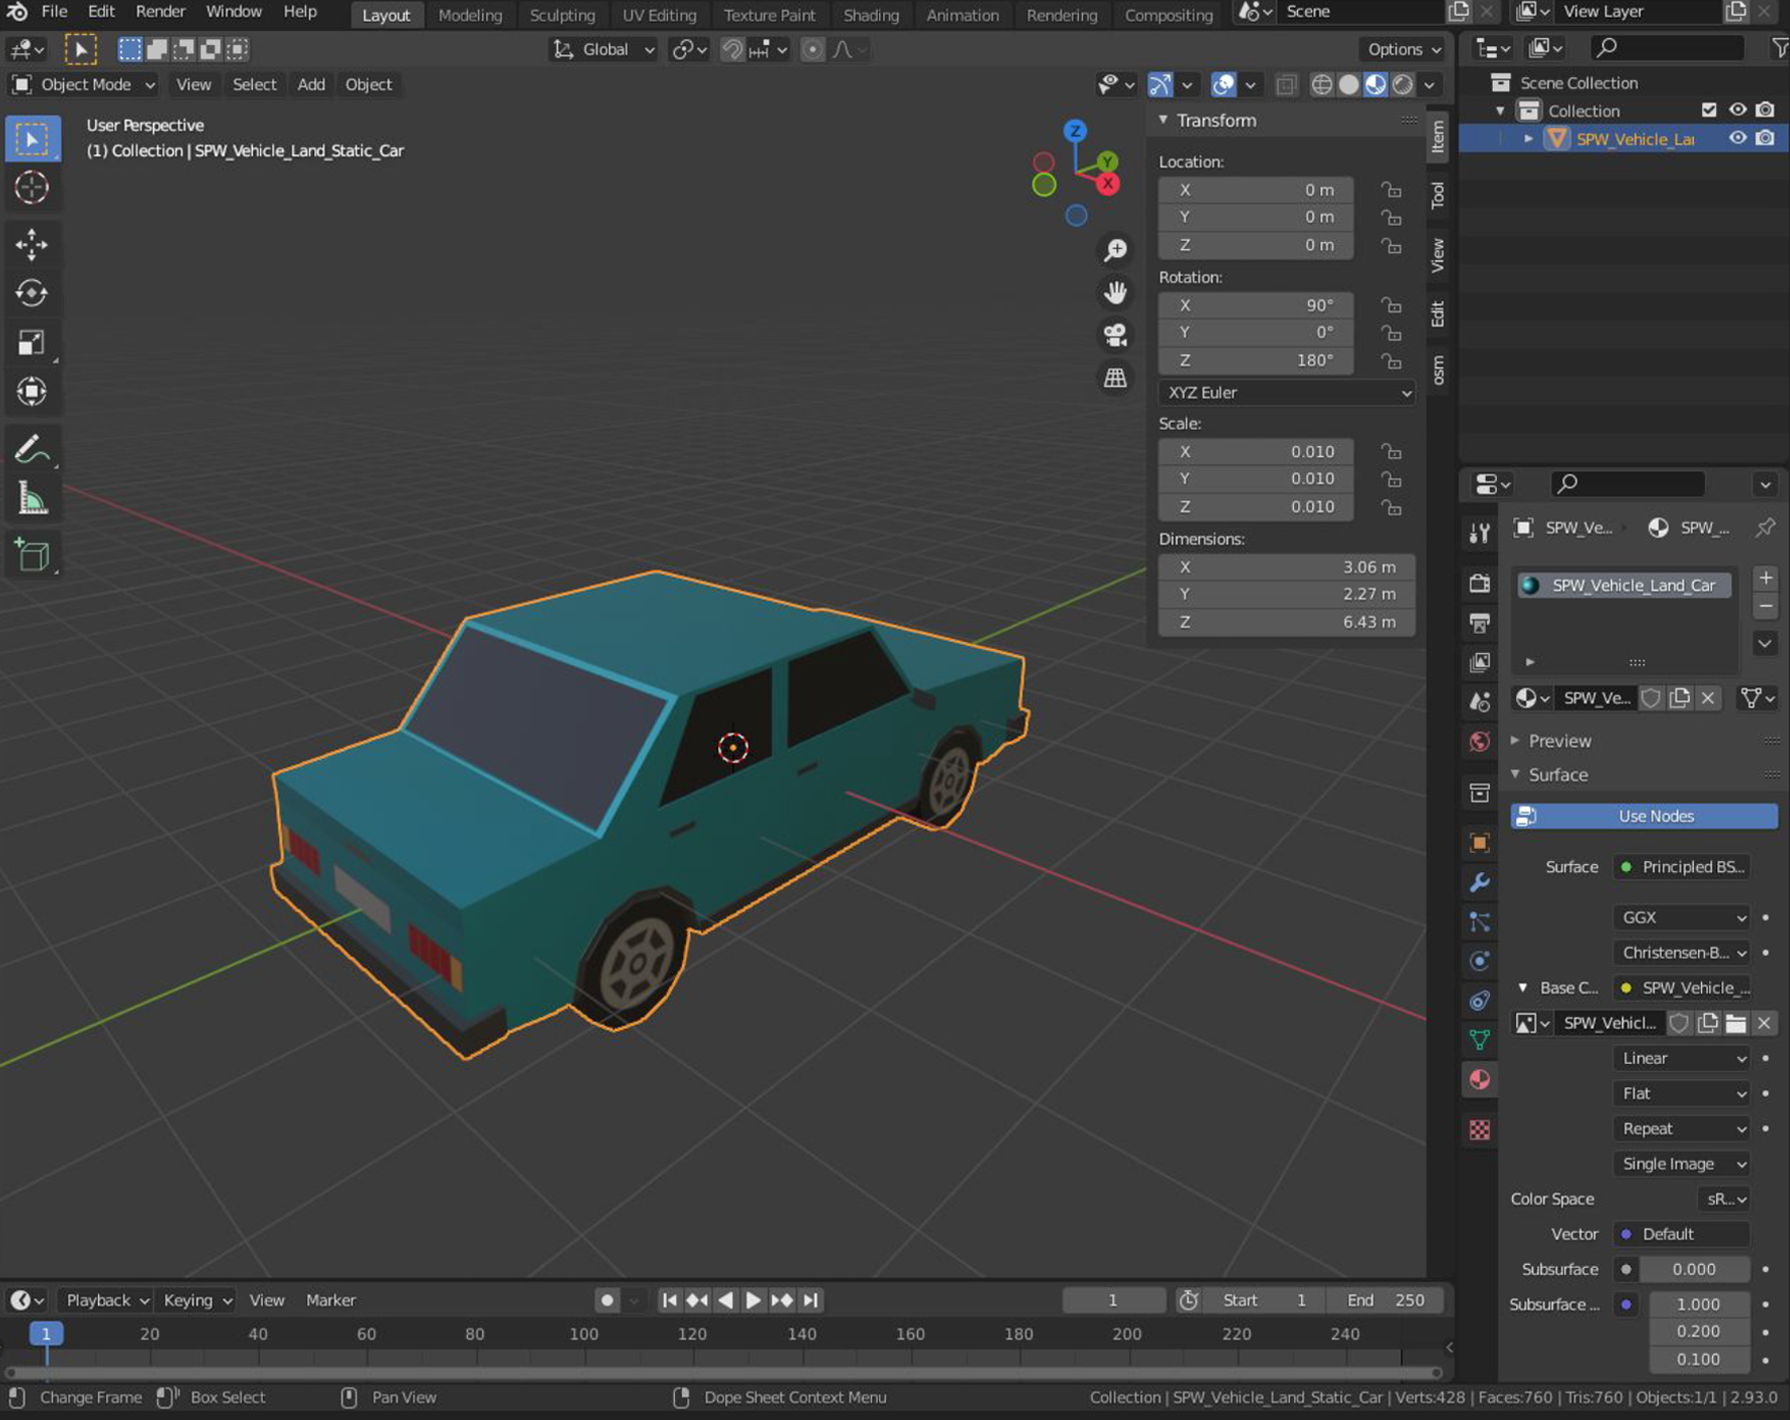
- For this example, we want to rotate the car to face front (positive y). Press ‘R’, followed by ‘Z’, then type in 180 and left-click.
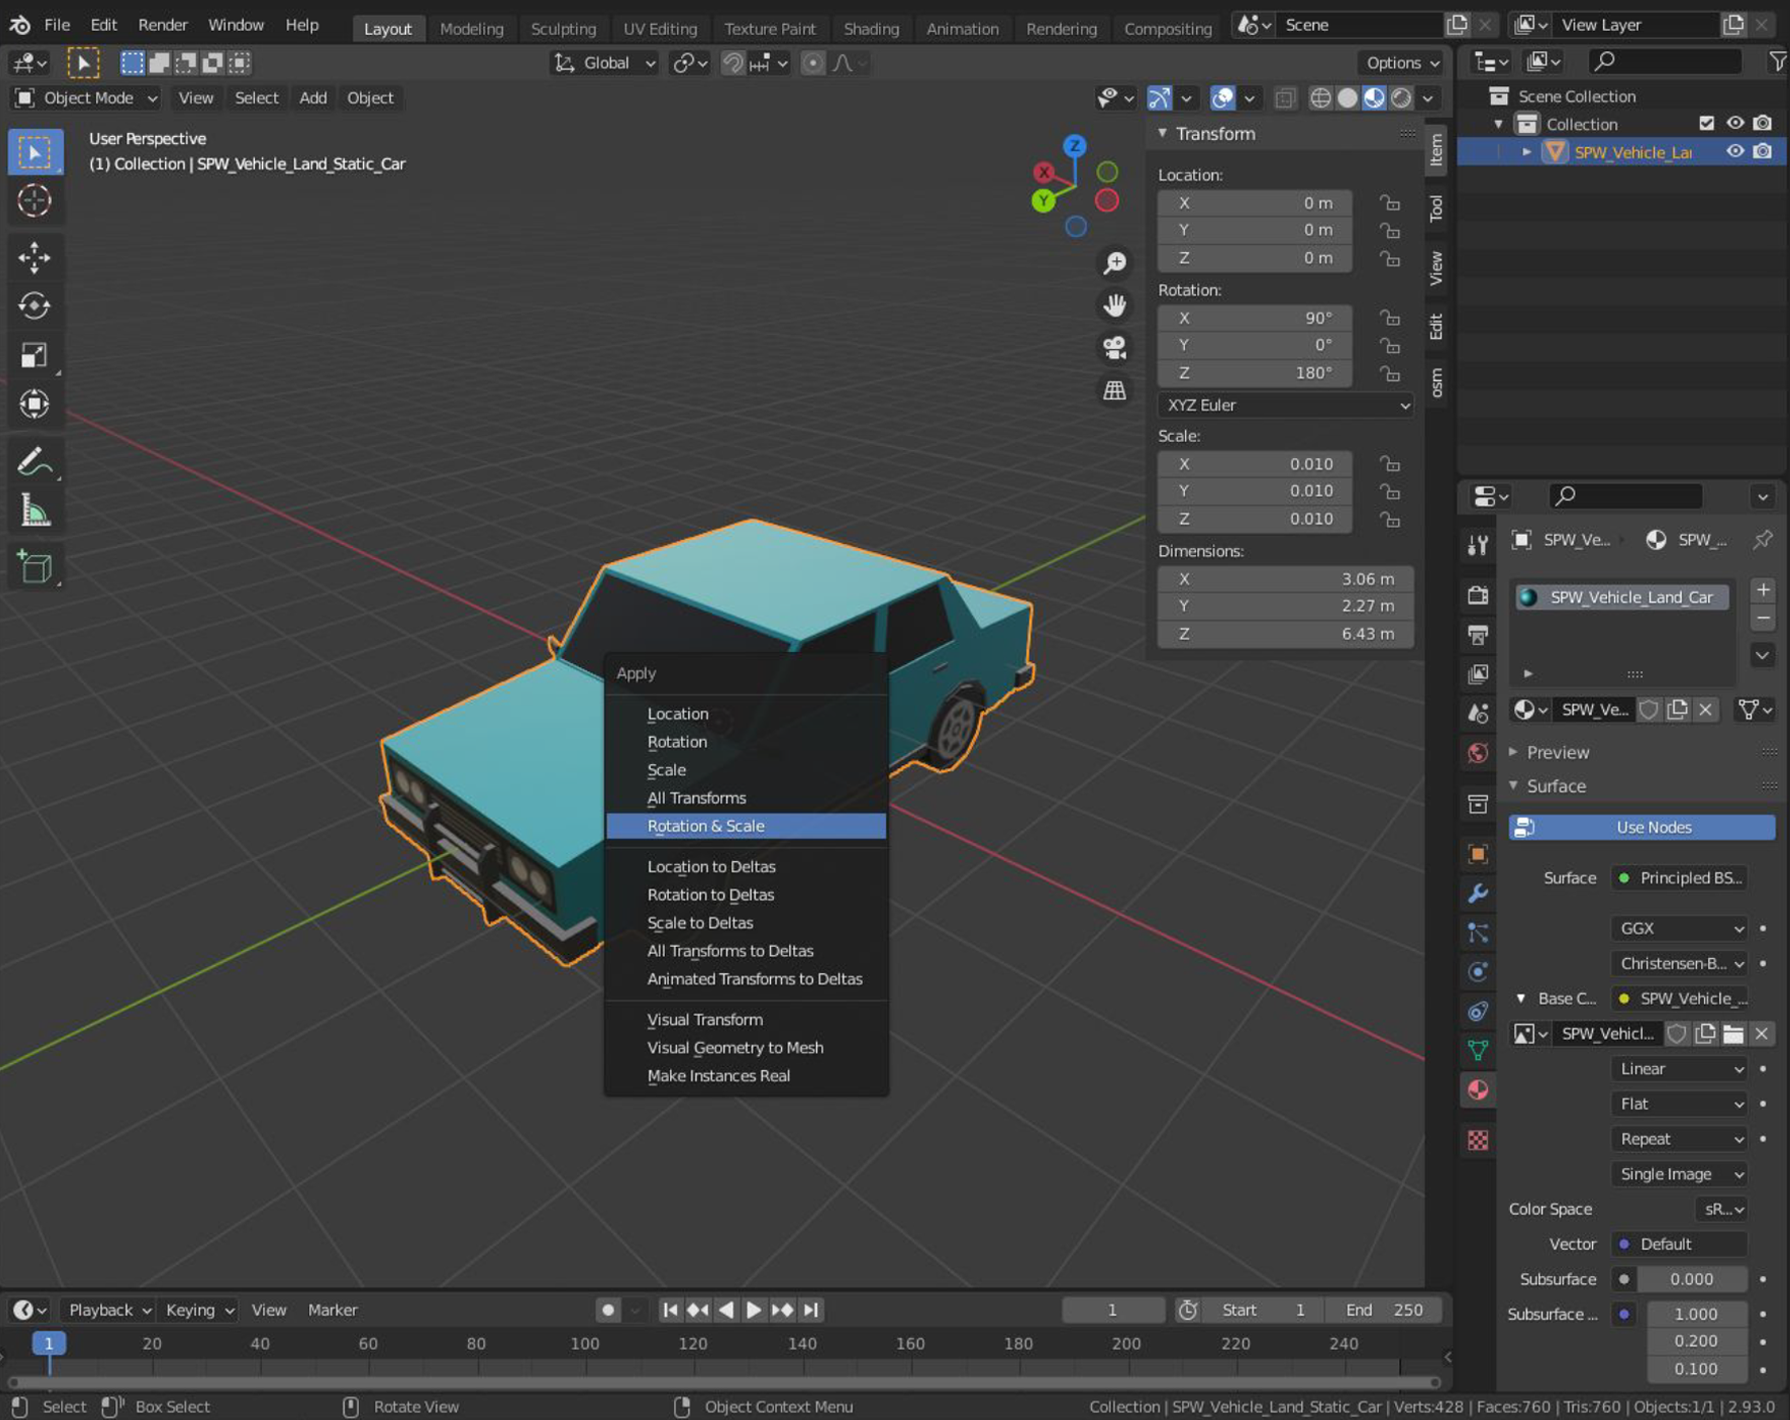
- We now need to set the Scale and Rotation values to 1 and 0 respectively in the Side Menu. Press “Ctrl” and “A” together and select Rotation & Scale.
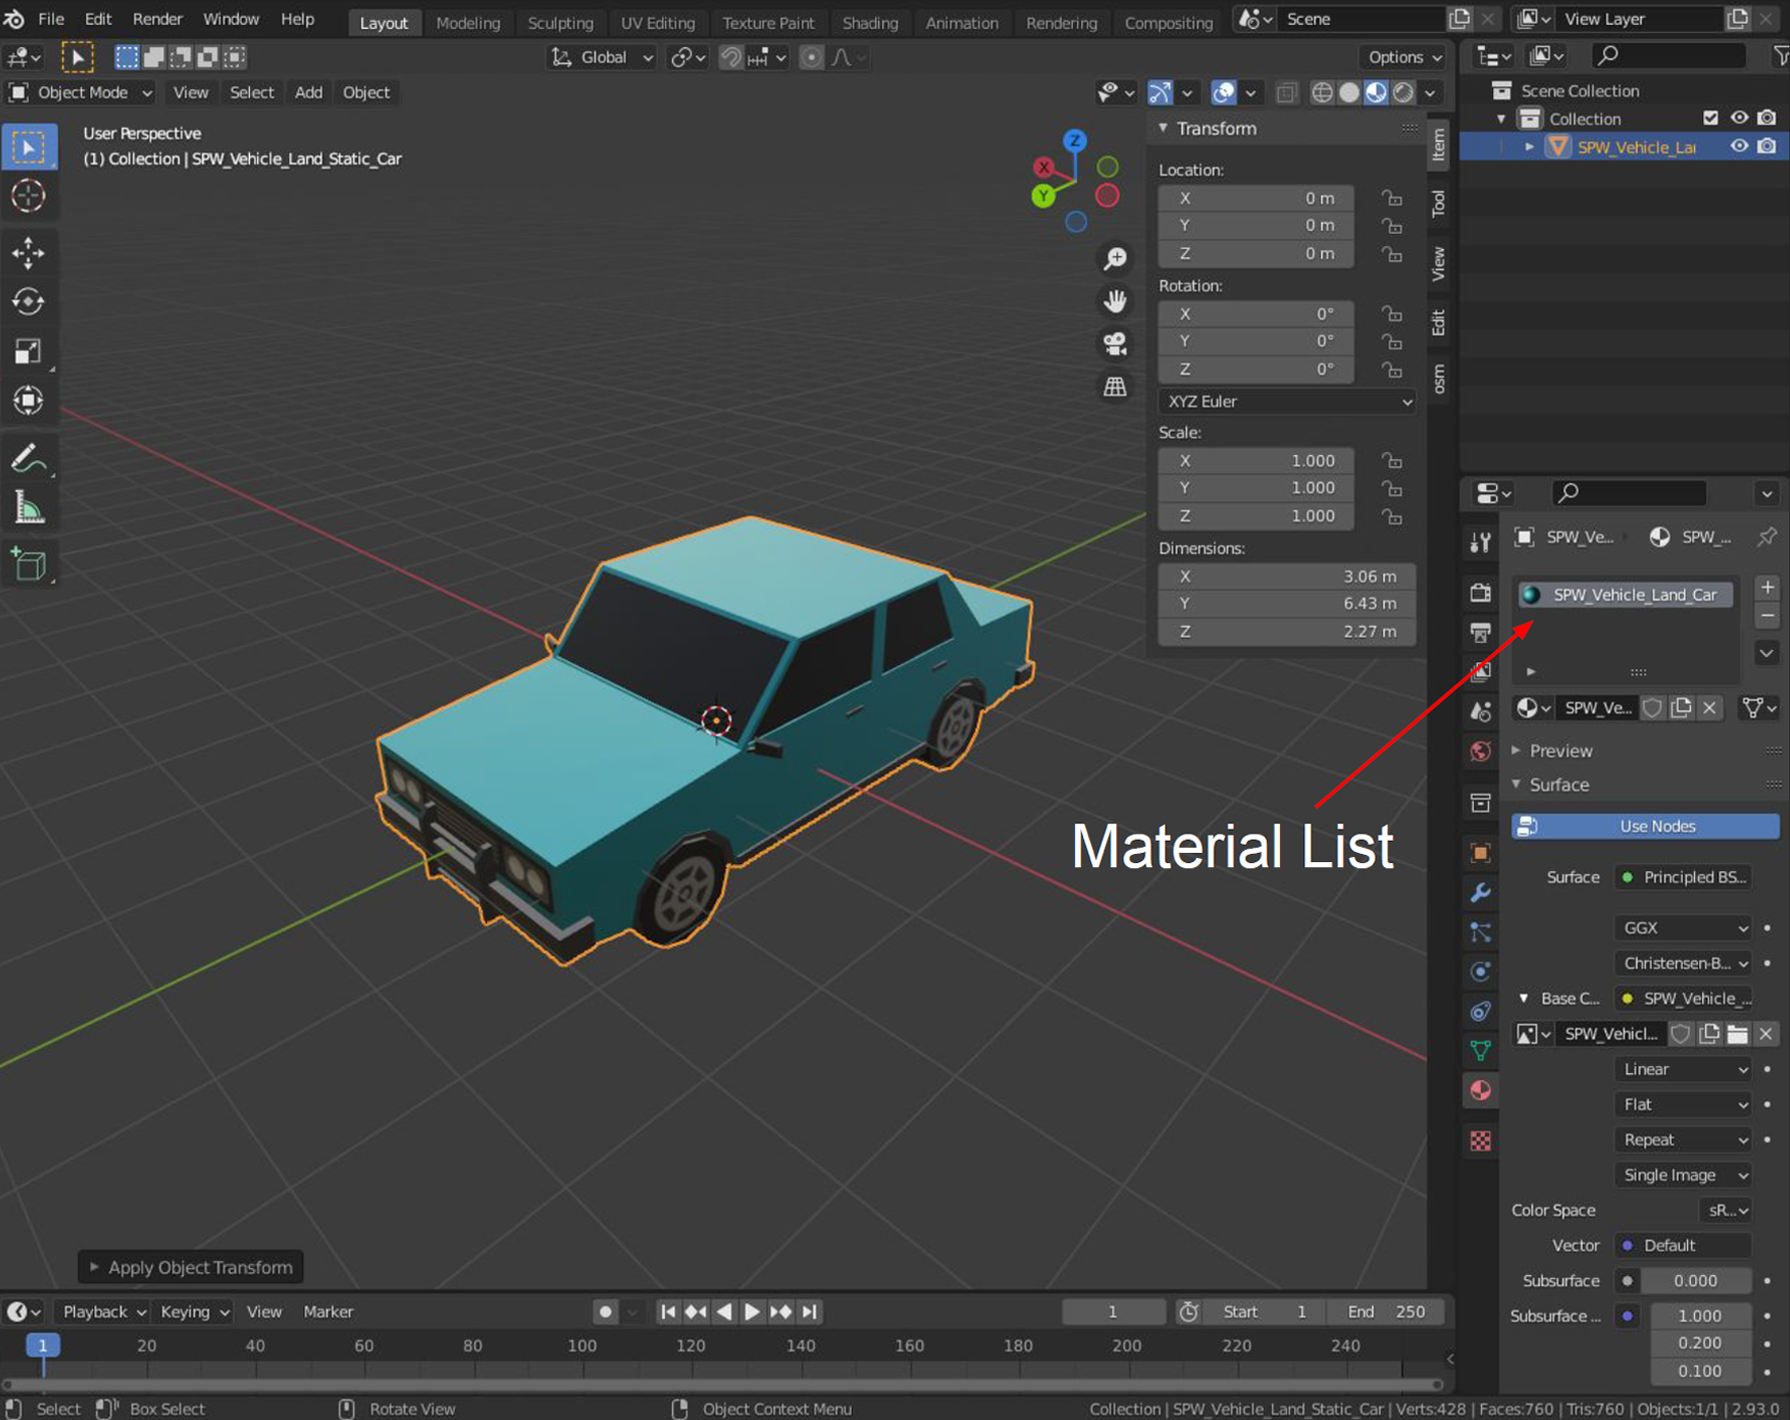
CHECK MATERIAL
- Each asset should only have one material on it to work well in MRx. To check, click on the Materials tab on the right toolbar.

- Make sure only one material is shown in the Material List. If an object has multiple materials, you will need to combine them into a single material.
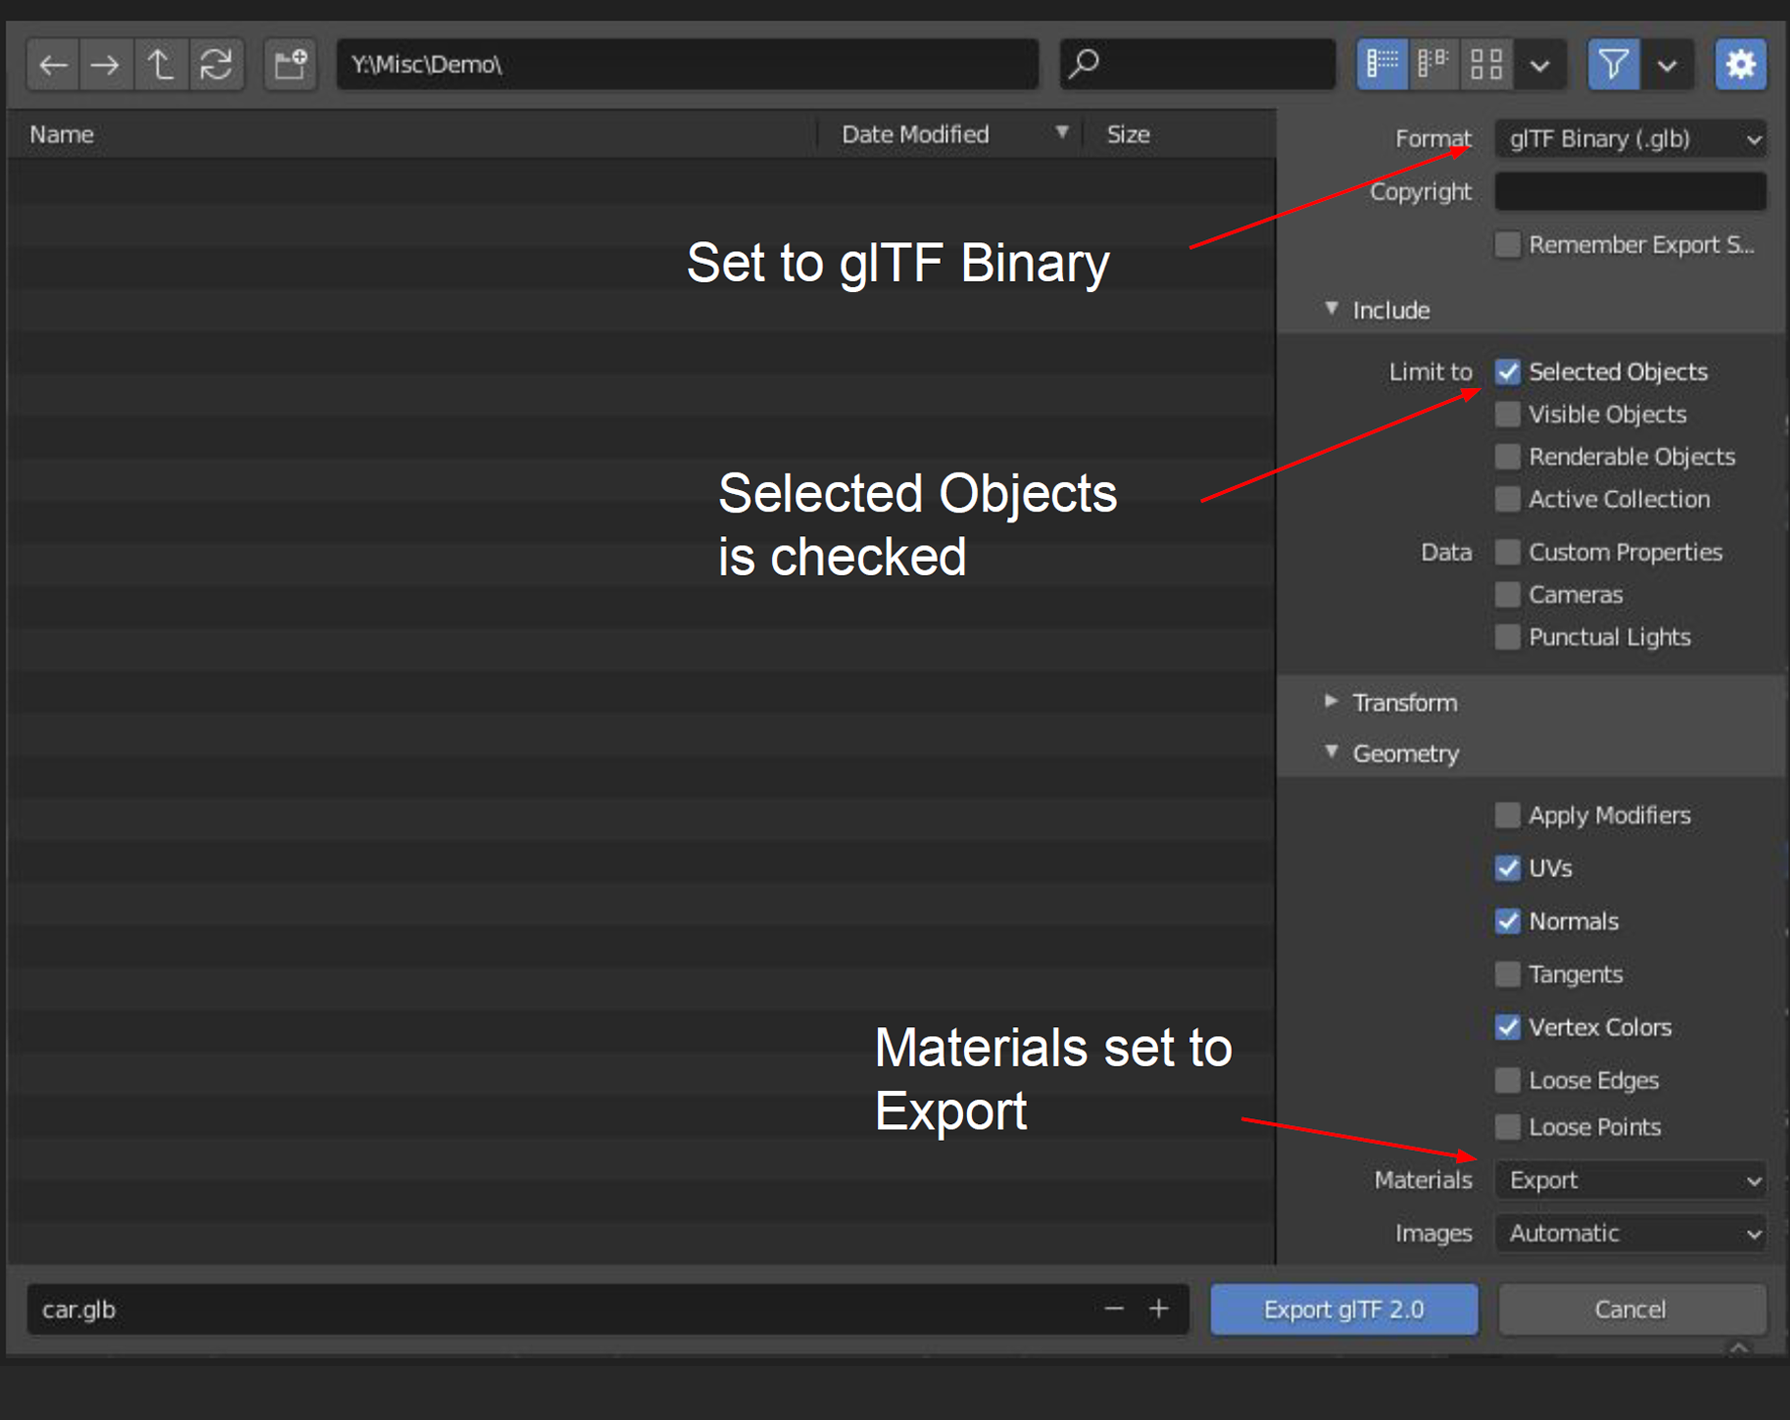
EXPORT ASSET
- Go to File > Export > glTF 2.0 (.glb/gltf)
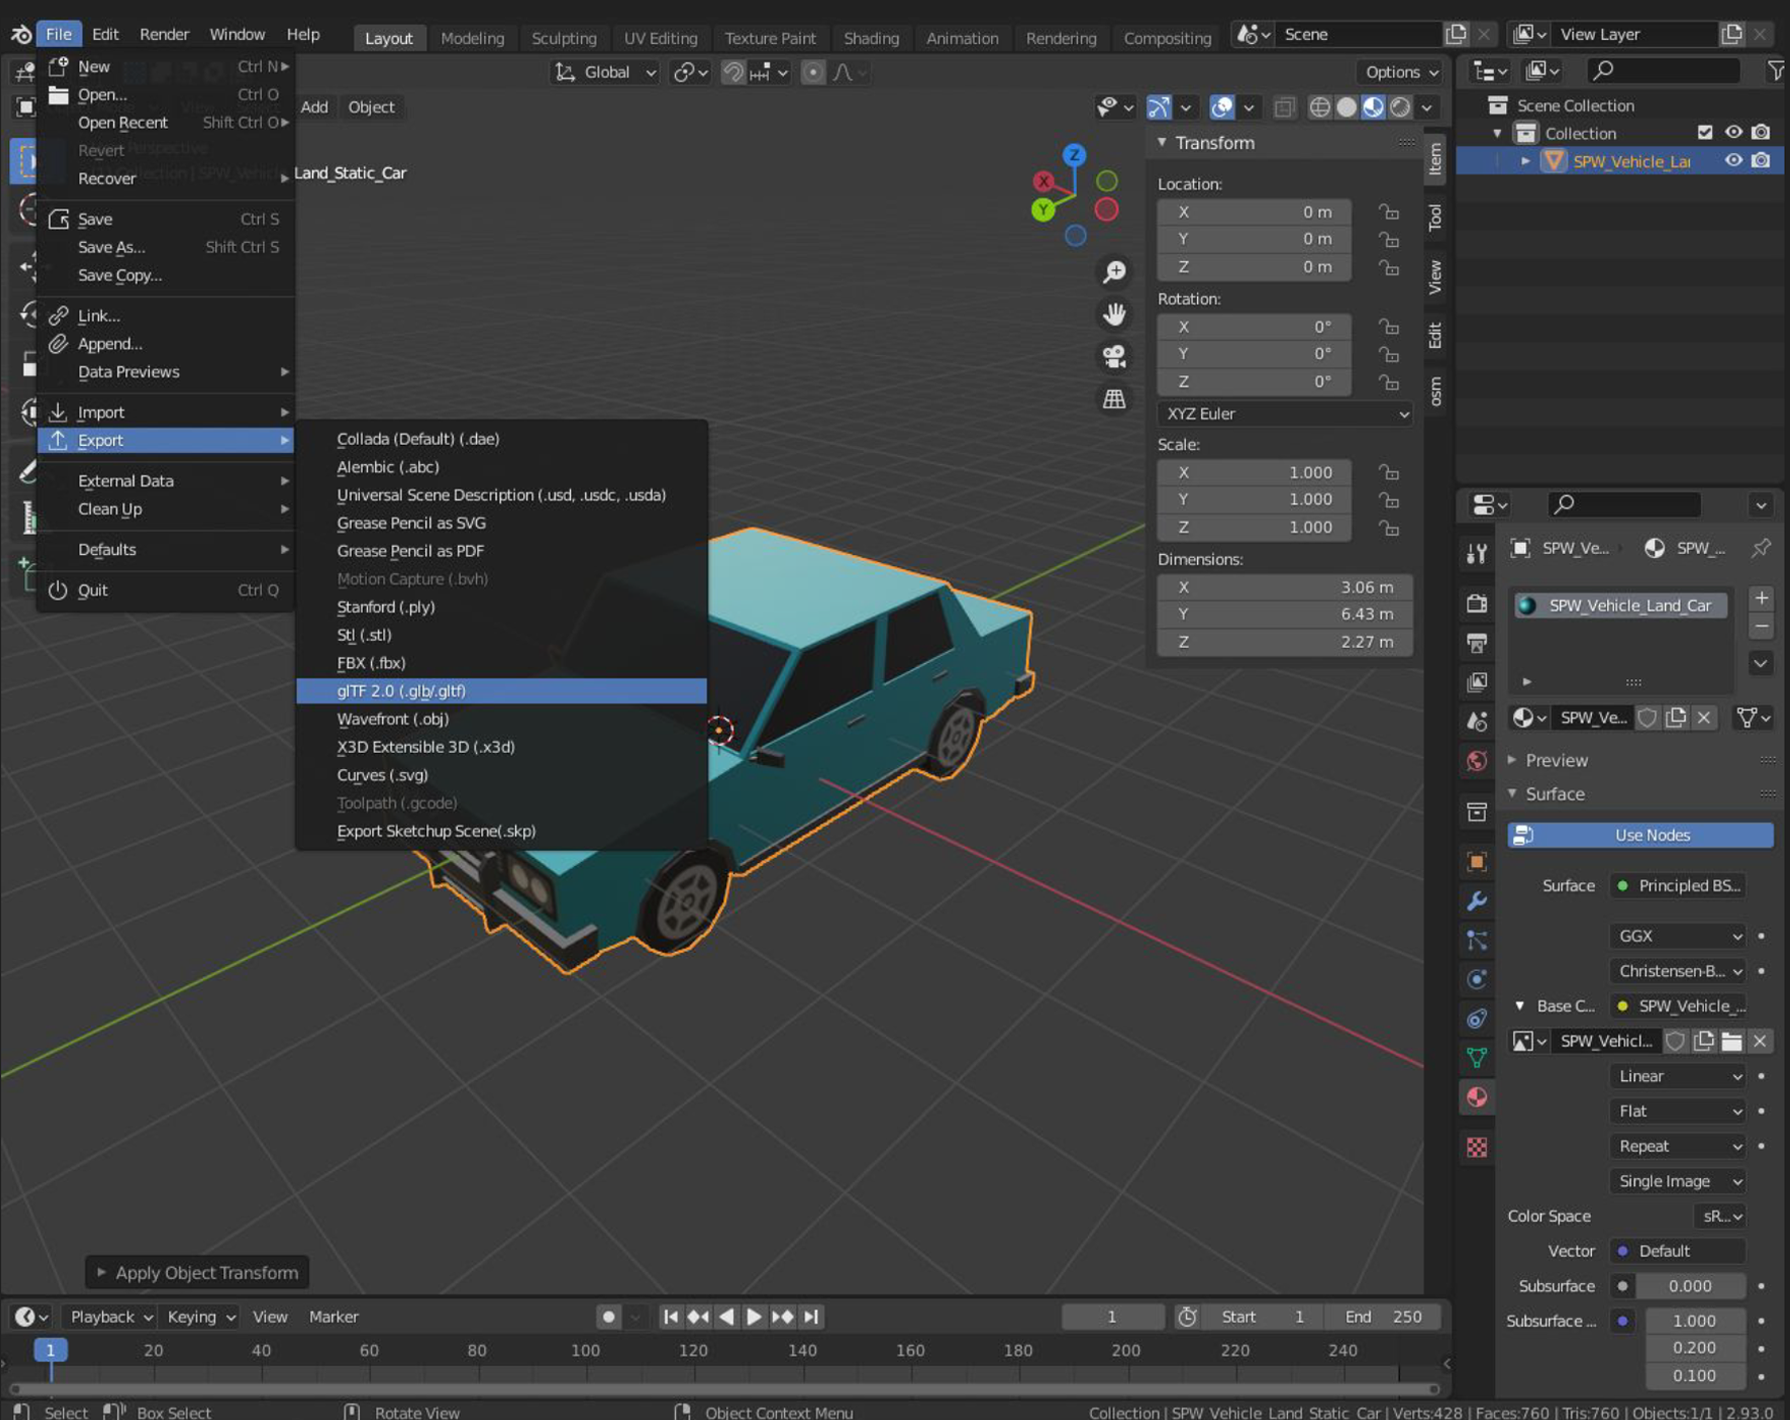
- Ensure Format is set to glTF Binary (.glb).
- Under Include list, ensure Limit to, ‘Selected Objects’ box is checked.
- Under Geometry list, ensure Materials is set to Export.
- Navigate to the desired export folder and input the desired filename. Click “Export glTF 2.0”